Showing posts with label invasive species. Show all posts

Sunday, December 22, 2019

Mainely Burger

I called this my Mainely burger because it reminds me of what my mother made for our family (in Maine). She often made us patties by hand chopping or grinding a combination of wild Maine shrimp and chicken. These 2 ingredients make delicious moist patties to be eaten whole in sandwiches/burgers or in slices accompanied by piping steamed rice, noodles or pasta. I prefer to fry my burger buns in a pat of butter or Benecol (plant-based) so the interior will not be too soggy.

Mainely burger
Mainely Burger (makes 2)

Ingredients:

2 hamburger buns, pan-fried with a pat of butter or Benacol until golden
Mayonnaise
Sriracha (hot sauce)
2 large Fried Soft-Shell Crabs (more if using smaller ones)
2 Mom's Chicken and Shrimp Patties (see recipe below)
A few slices of Pan-Fried Red Onion (see recipe below)
1 young kelp, blanched in boiling water for about 10 seconds, strained, cut into 2-inch lengths
Tomato slices
Avocado slices
Fresh cilantro, optional

Method:

Layer the ingredients according to your taste.

mom's chicken and shrimp patty

Mom's Chicken and Shrimp Patties (makes 4 patties)

Ingredients:

4 oz shrimp, peeled, deveined, diced
6 oz chicken thigh, deboned, skinless, diced
1/2 tsp shallot-garlic-ginger seasoning (see recipe below)
About 1 Tbsp of egg white
A pinch of salt
A pinch of ground pepper (black or white)

Method:

Combine all ingredients and either hand chop or use a food processor to mince everything. The texture is up to you. I prefer to mince everything slightly on the rough side. Divide the mixture into 4 parts and wet your palm with a little oil and form a round mound with each part. Refrigerate the mound to chill either overnight or at least 4-6 hours. Pan fry with a little oil until cooked thoroughly and golden on each side (about 10 minutes). May add a little oil to the back of the spatula to help press the patties down to make thinner. To test for doneness slice the center to check. The meat should be opaque once cooked.

shallot-garlic-ginger seasoning
Shallot-Garlic-Ginger Seasoning

Ingredients:

1 large shallot, peeled, grated
2 large garlic cloves, peeled, grated
1/2 inch x 1/2 inch ginger, peeled, grated

Method:

Mix well.

pan-fried red onion
Pan-Fried Red Onion

Ingredients:

About 1/2 tsp oil (vegetable or your preference)
1 red onion, peeled, sliced
A pinch of salt (optional)

Method:

Fry the onion in oil until soft. Season with salt if interested.


Saturday, September 14, 2019

Crab Brulee (makes 6 ramekins)

 
crab brulee

I first made non-dairy crème brûlée using strictly coconut milk instead of my normal heavy cream so that my mother can eat it as she is moderately lactose intolerant. The final result turned out creamy; much better and tastier than I had imagined. The term "crab brulee" coined by our friend, Mark Broomer. Thank you, Mark!

I used 1 Tahitian vanilla pod. You may use 1/2 teaspoon of vanilla extract if you prefer this over the beans.


crab brulee
Crab Brulee (makes 6 ramekins)

Ingredients:

Roe from 8-10 adult female live green crabs
8 large egg yolks
3 Tbsp white sugar (or according to your taste), plus 1 tsp white sugar
14 oz (400 mL) of coconut milk
1 vanilla pod
Boiling water (for bath)
Turbinado sugar (raw sugar), about 1/4 to 1/2 tsp per ramekin (or according to your taste and health)
Fresh berries to garnish if interested

Method:

Wash the female green crabs and drain. Remove the roe (eggs) and set aside. Rinse the roe and strain. Remove and discard any dark pieces or any non-roe bits. Add 1 teaspoon of sugar to the roe. Keep refrigerated until ready to use.

Boil water (this will be for the water bath), preheat the oven to 350 degrees F.

In a medium size metal or glass bowl, whisk yolks and 3 tablespoons of white sugar together and set aside.

Shake the coconut milk can, open and pour it in a small pot. Split the vanilla pod lengthwise and scrape all the vanilla bean caviar (using the tip of a knife) and add these tiny beans and pod to the pot. Cook over medium high heat. Once the liquid starts to boil turn heat down to a simmer, stir occasionally for about 5 minutes.

Temper the cream and vanilla mixture initially a little at a time (about one ladle at a time) to the bowl with the yolks and sugar, while constantly whisking the contents.

Place 6 ramekins in a casserole dish. Divide each ramekin with the liquid (mixture). Divide the crab roe in each ramekin. Place the casserole dish with the filled ramekins inside the oven. Pour the hot bath water into the casserole dish about 1/3 up to the ramekins. Take care not to burn yourself or pour any water inside the ramekins.

Bake for about 40 minutes, remove the casserole dish and let them cool. Once done the top will resemble a custard instead of liquid.

When ready to eat, sprinkle the turbinado sugar on top of each ramekin and blow torch the top to caramelize the sugar. You may put the ramekins in the oven to broil (for a minute or two) and this will help caramelize the sugar. Keep a close eye on the ramekins while they are in the oven as the high heat will easily burn the sugar instead of caramelize it.

For any that you cannot eat right away you may wrap each ramekin in plastic and refrigerate.

Friday, July 26, 2019

Fried Crab Salad

This fried crab salad is inspired by my parents and friends' garden. The colorful edible flowers brighten this dish while adding texture and taste. Select the edible flowers that you prefer. Some people may find that the mustard flowers are too bitter but I actually enjoy their flavor. Be sure the fresh flowers you use are all edible and that they have not been sprayed by pesticides. If you are unsure it is best to avoid eating them.

In order to add extra flour coating to the crabs I dip the crabs in a whisked egg before dredging them in the seasoned flour.

fried crab salad

Fried Crab Salad

Ingredients:

5-6 young Romaine lettuce leaves, washed well
1 anchovy, mashed itno small bits
3 Fried Soft-Shell Green Crabs
About 10 borage flowers
About 8 bee balm petals
About 8 marigold petals
About 4 viola flowers
A small handful of cooked corn kernels
About 3 small mustard flower clusters
About 2-3 tsp olive oil
About 1-2 tsp balsamic glaze (or balsamic vinegar reduction)

Method:

Arrange the lettuce, anchovy, and fried crabs on a plate. Scatter the flowers and corn kernels over everything. Drizzle oil and balsamic glaze over the salad.

Tuesday, June 25, 2019

Fried Rice

This is an easy dish to make and you can easily adapt it using any type of protein that you prefer. You can even mix different types of meat with seafood such as chicken and fish or shrimp. My mother often makes a delicious batch using chicken, shrimp and Chinese sausage. In this recipe I use monkfish. The beauty about monkfish is that it does not flake or break into small bits when cooked. I used a bag of frozen mixed vegetables for convenience but you can choose any fresh or frozen vegetables that you prefer. This mixed vegetables consist of peas, corn, carrots, green beans and lima beans.

I normally cook my rice in water but for this recipe I use green crab stock for extra flavoring. This time I simmer the stock for 30 minutes for a richer stock. Generally the liquid ratio to the uncooked rice is based on your preference of how dry or wet you want your cooked rice to be, the age of your uncooked rice, and the type of uncooked rice you use. I made my long-grain jasmine white rice a day ahead, fluffed the cooked rice with chopsticks and kept it in the refrigerator after it has been cooled. This way the rice will be a little drier. In my family we make fried rice using leftover rice. 

I always wash my rice in water to remove some of the starch and any non-rice items before I cook it. In the rural part of Vietnam some of the grains are dried outside, sometimes along the road (aka Highway 1). I remember my late grandmother looking through the rice before she cooked and removed non-rice items such as insects, tiny pebbles, or rice husks. Luckily here in the US the purchased rice is often very clean and you can skip this step. You can add either salted or unsalted green crab roe. I prefer the salted crabs but that's because I have some in my kitchen. If you have soft shell crabs you can fry some and garnish your dish.

fried rice
Fried Rice

Ingredients:

3 cups uncooked long-grain white rice
2 1/2 cups Simple Green Crab Stock
1 oz Salted Green Crab (Ba Khia) roe, chopped
2 Tbsp canola oil (or another type of your choice)
1/2 cup chopped white or yellow onion
1/2 lb monkfish tail, cut into small bite size
12 oz bag of frozen mixed vegetables (or cut your own)
4 Tbsp soy sauce
4 Tbsp tomato paste
1/4 cup chopped scallion
1/2 to 1 tsp ground black or white pepper

Method:

Cook the rice in stock. After it is cooked, fluff it with a fork and let it air dry to cool.

Steam the Salted Green Crab (Ba Khia) for about 8-10 minutes and remove the roe once the crabs are cooled. Set the roe aside.

Heat a large non-stock wok or pan and add oil. Once the oil is hot add onion. Saute the onion until translucent and soft. Add monkfish and saute until it is just cooked or opague. Remove from the wok or pan and set aside. Strain and discard any liquid before using.

Rinse the vegetables and strain if using frozen. Using medium high heat stir in the vegetables in the same wok or pan and add soy sauce and tomato paste. Mix everything well and once the vegetables are cooked gradually add a little of rice. Blend the rice in with the rest of the ingredients. Continue to add more rice until all of the rice is in the pot. Try to blend all the rice in well so there will be no white rice left. Stir in roe, scallion and pepper. Mix everything well. Turn off heat after the roe and scallion are heated through or the scallion is just cooked.

fried rice with sea scallops and steamed vegetables

Sunday, April 28, 2019

Scallop Crudo

I enjoy eating raw scallops especially when they are harvested by my local fisherman, Mike Anderson of Rimrack Fish. The Italians have their version of raw seafood dish known as crudo. The ones that I ate in the past seemed to have some sort of oil added. Here I did not add any but you certainly can drizzle a little of your favorite oil on top for extra flavors.

scallop crudo

Scallop Crudo

Ingredients:

1 large scallop, tough muscle removed and discard, sliced thinly against the grain
Meat and roe from 1-2 cooked Salted Green Crab (Ba Khia), depending on how much you prefer
Several thinly slices of red onion, soaked in cold water and squeezed out the liquid
A large pinch of cilantro leaves, finely chopped
A pinch of Peruvian chocolate nibs (from Enna Chocolate)
A small pinch of dried lime zest
A small pinch of dried lemon zest
A small pinch of dried blood orange zest
A small pinch of dried seaweed
A small pinch of dried chili peppers
Drizzle of freshly squeezed lime juice

Method:

Thinly slice the scallop against the grain and arrange them on a plate. Arrange the onion slices and salted green crab meat and roe on the plate. Add a large pinch of cilantro, chocolate nibs, and sprinkle on the crumbled citric zest, seaweed and chili peppers. Drizzle with freshly squeezed lime juice.

Helpful Hints:

*If you are interested in purchasing the Peruvivan chocolate nibs (unsweetened) please contact Enna Chocolate directly.
*If you are interested in purchasing scallops or squid from Rimrack Fish, please contact them directly. Unfortuately the scallop season has just ended as of this month (April 2019).

Friday, April 26, 2019

Salted Green Crabs (Ba Khia)

Salted or fermented crabs, known as ba khía in Vietnamese, is a way to preserve a special type of small crabs found in muddy areas in the mangroves without the need of refrigeration. Ba khía is a popular food item in the Mekong Delta (the southern region of Vietnam) such as my former home town of Soc Trang. Because they are salty even just one crab can last a person several meals! If you have nothing else to eat except rice and ba khía you can probably survive on these two items for many months! 

Prior to eating these crabs there is a special preparation that my family uses. We take the fermented crab crabs apart by removing and discarding the carapaces, gills, and aprons. We wash them in warm water several times and break each crab body into 4-6 sections. We then mix the prepared crabs with lime juice, garlic, chili peppers and sugar. This seasoned ba khía lasts weeks in the refrigerator. According to my father if you use vinegar instead of lime juice you can keep it longer. Since it is very salty I eat only a tiny fraction of the crab, usually 2-3 legs with about 1/8 to 1/4 of the body with lots of steamed rice.

salted green crabs (ba khia)
Salted Green Crabs (Ba Khía)

Ingredients:


4 cups water
1/2 cup sea salt
10 green crabs (preferably females)
1/2 cup rice wine (optional)

Method:

Boil the water and add sea salt, stir until the salt dissolves. Let the liquid cool completely. Wash the crabs well and let them drain. Place the crabs in a glass or ceramic jar. Pour the cooled salted liquid over the crabs. May add rice wine if using. May use a small glass or ceramic plate to keep the crabs submerged in the liquid. Cover tightly and keep refrigerated up to 2 months. The crabs will be salty and ready to eat in 5 days.

Helpful Hints:

*My father advises adding rice wine (such as sake) to the batch for extra fragrance.
*The uncooked salted crab meat should taste salty with a gelatinous consistency. The salted green crab meat may slowly dissolve to nothing if you keep them longer than 2-3 months.
*I prefer to ferment female crabs as I can use them in more dishes. 
*Use only freshly caught crabs as they have more meat.

Tuesday, January 1, 2019

Stir-Fried Chicken and Vegetables

Often times when I have limited time (less than 15 minutes) and I want a quick meal I make a stir-fry. When I work 4 long consecutive days (in the clinic) I would cut, wash and dry all of the vegetables, and store them in the refrigerator. The day before I would thaw a few small pieces of meat from my freezer in the refrigerator overnight. Before leaving the clinic I would text my husband to cook rice and when I get home I can quickly cut, wash my meat, cook everything and we eat in 10 minutes. 

You can make it vegetarian, meat, seafood or a combination of meat and seafood. Cook the hardest vegetables first. If I have time I steam the hardest vegetables (such as carrots and broccoli) partially before using. The keys to making a good stir-fry are to keep the heat high and to not overcook the vegetables. They should be just cooked--have a bright color, maintain their crunchiness and retain most of their nutrients. I love fresh cilantro and when I have some in my kitchen I normally chop leaves from a sprig or two and add after everything has been cooked. 

I found this wonderful creative short animation on green crabs called, Attack of the Green Crabs.

stir-fried chicken and vegetables
Stir-Fried Chicken and Vegetables

Ingredients:

1 Tbsp vegetable oil
1/2 lb chicken thigh, sliced into bite size
1 large garlic clove, smashed, chopped
About 1-2 tsp of grated fresh ginger
1 large carrot, peeled, sliced 1/8th inch thick
1 large broccoli floret, cut into bite size
8 oz sugar snap peas, removed the strings from both sides
12 oz baby bella mushrooms, halved
1 recipe of Green Crab Stir-Fry Sauce (see recipe below)

Method:

Add oil to a heated large pan or wok. Keep the heat to medium to high. Add chicken, garlic, and ginger, saute about 3-5 minutes or until the chicken is almost cooked. Avoid burning the garlic. Add carrot and broccoli. Saute until the carrot and broccoli are partially cooked. Add snap peas, and mushrooms. Saute until the peas are just cooked. Once all the vegetables and meat are cooked then in the last minute add the sauce. Stir or shuffle the pan or wok a few times until all the ingredients are coated with the sauce.

Green Crab Stir-Fry Sauce

 Ingredients:

1 cup green crab stock (please see Simple Green Crab Stock link)
1 Tbsp cornstarch
1 tsp chicken stock powder
1 tsp fish sauce
1 tsp soy sauce
2 Tbsp oyster sauce

Method:

Mix all ingredients together. May adjust the seasoning according to your taste. Be sure to stir the sauce prior to using.

Helpful Hints:

*This recipe may be too much to fit in one wok or even a large pan. You may divide the ingredients and sauce in half and make 2 batches. I made half a batch one day and the other half the next day.
*I prefer chicken thighs over the breasts since they have more flavors.
*I chose these vegetables because they are the ones that are available fresh at my local market at this time of the year. Be sure to buy the broccoli that is firm to the touch, green in color and the stalk side is smooth without a hallowed out area. If you have a broccoli stalk do not discard, remove the tough outer skin and use the interior stalk for cooking.
*It is best to use unsalted green crab stock for this recipe. If you are using salted stock then decrease your seasoning for the sauce. 
*If you would like to add sesame oil to the stir-fry then drizzle a little at the end of cooking. 

Thursday, December 13, 2018

Seafood and Kimchi Soup

My mother made this soup while she stayed with me during my recovery. She placed the partially thawed prepared green crabs in a few clean plastic bags and crushed them against a cement block using a rock from my garden. She agrees that this method works much better as opposed to crushing them with a blender.


my mother hand crushing the crabs
This soup is made with kimchi that I fermented months ago. They are more sour than the freshly made kind. You may purchase kimchi at your local markets. The mixed seafood package is from my local grocery market and found in the frozen section. Once opened you can rinse them in a strainer and add to the soup. If the mixed seafood has been previously cooked then it does not take long to reheat them. I find that this soup tastes even better the next 1-2 days!

seafood and kimchi soup

Seafood and Kimchi Soup

Ingredients:

1 lb prepared hard shell green crabs (about 20 adult crabs)
7 cups cold water
1 lb seafood mix, rinsed in cold water, strained
About 1 1/2 to 2 cups kimchi (home-made or store bought), cut into bite size
1 container of soft tofu (about 12 oz), cut into bite size
1 scallion, green parts only, chopped or cut into 1/2 or 1 inch lengths
2 Tbsp fish sauce (nước mắm)
1 Tbsp chicken stock powder

Method:

Place the crabs into 2-3 layers of freezer or plastic bags. Pound the crabs until they are crushed. Add a little cold water (about 1/3 of the water), use a spoon to stir the mixture and use a fine strainer to strain the liquid and the fine crab bits into a pot. Repeat 2 more times until all the water has been used up. Please see links below for tutorial assist.

Bring the pot to a boil over high heat. Do not stir. Do not cover the pot. Once the liquid starts to boil the crab bits will float up to the surface in pieces. Let the liquid boils gently for a few minutes (up to about 5 minutes) or until all the pieces are done floating up. Avoid allowing the liquid to boil over. Rinse the seafood mix and add to the pot. Add kimchi, and tofu and stir the pot once. Cook for another 3-5 minutes or until everything is heated through. Add scallions and season with fish sauce and chicken stock powder.


Helpful Hints:

*Please see Vietnamese-Style Crab Stock for a tutorial on how to make the stock for this recipe.
*Please see How to Prepare Green Crab for Making Stock for a tutorial on how to prepare the crabs.
*The 7 cups of water will yield about 6 cups of crab liquid.
*If you are to use a blender to crush the crabs then use only the soft crab bodies. Discard the hard carapace, apron, legs, and claws.

Tuesday, August 21, 2018

Green Crab Po Boy

My husband and I have always enjoyed our visits to New Orleans. We would explore the city on foot all day--admiring the historic architecture, feasting on fresh seafood and delicious Creole and Cajun cuisine and occasionally stopping for a drink outside at one of the cafes. We then stay up past our bedtime soaking in the nightlife--watching the crowds and listening to the energetic live music. The next day we would get up and do it all over again!

One of the sandwiches that I particularly like to eat is known as a po' boy (also poor boy). They are stuffed with various fillings. The ones that I prefer is deep-fried seafood. One year I had the tastiest oyster po' boy--deep-fried succulent oysters, nicely blended sauce, just enough shredded lettuce and tomato slices for a flavorful and satisfying sandwich. Unfortunately I was not able to get that same po' boy again despite returning to the same establishment. 

Here is my version of a po' boy made from the soft-shell green crabs that were given to me by scientist/researcher, Dr. Bradt (thank you!). Have I mentioned that I secretly love the fact that I get to eat lab crabs without working or stepping foot in an actual scientific lab?! I toast my roll by frying the interior with a little butter in a skillet until golden (to prevent it from getting soggy and for extra flavors), spread some chilled rémoulade (sauce) on the inside and layer on the deep fried crabs, finely shredded lettuce and tomato slices. Now this is one special po' boy that I know I will not find (at least for now) in the Big Easy!

green crab po boy

Green Crab Po Boy

Ingredients:

Rémoulade (see recipe below)
About 1 1/2 cup finely shredded lettuce
1 large tomato, thin slices
2 Hoagie Rolls or Split Top Rolls, sliced lengthwise about 3/4 of the way leaving a hinge
6 fried soft-shell green crabs (see Fried Soft-Shell Green Crabs link)

Method:

Make the rémoulade, cover and keep refrigerated. Shred the lettuce and slice the tomato, cover and keep refrigerated. Heat a skillet and melt a pat (about 1/2 to 1 tablespoon) of butter. Slice the rolls lengthwise about 3/4 of the way, leaving a hinge so the 2 halves remain attach. Fry the rolls with the interior facing the bottom of a skillet. Once the interior is golden remove from heat and set aside. Fry the crabs, follow the directions for Fried Soft-Shell Green Crabs.

Spread some of the rémoulade (as much as you prefer) on both sides of the interior of each roll. Layer on the tomato slices, lettuce, fried crabs and more lettuce. Serve while the crabs are still hot and crispy.

Helpful Hints:

*If you prefer more corn flour on your crabs then coat the crabs in a whisked egg, shake off excess egg and place them in the mixed corn flour. For this po' boy recipe, I prefer the crabs to have a little extra flour.
*You may use a plate, a bag or a container for the mixed flour. A bag or a container will make it less messy and help with a quicker clean up later.
*The green crabs may have enough natural salt. If you are on a low sodium diet or prefer to eat less salt then you may want to omit the salt in the flour.
*I was able to purchase these long rolls from my local market. They are labeled as Split Top Rolls from Fantini Baking Co. from Haverhill, Massachusetts. 


rémoulade
Rémoulade (makes about 1 1/4 cups)

Ingredients:

1 cup mayonnaise
1/4 tsp paprika (preferably sweet kind)
2 tsp mustard
1 large garlic clove, grated (about 2 tsp)
1 tsp sriracha sauce
1 Tbsp capers, minced
2 slices of Sweet Bread & Butter Chips (pickles), chopped (about 1 Tbsp)
1 Tbsp Sweet Bread & Butter Chips (pickles) juice
1 Tbsp chopped fresh chives
1 Tbsp minced onion or shallot

Method:

Mix all ingredients, cover and chill in the refrigerator until ready to use.

Wednesday, August 8, 2018

How to Prepare Hard-Shell Green Crabs

My method of preparing hard-shell green crabs may sound time-consuming but I find that it is a better process to get the most out of my crabs. Part of my process is to clean the crabs by removing mud and sand, even though ingesting a little on occasion is not harmful to most people. The other essential part is the removal of the yellow-orange caviar (roe) and/or crab mustard, if there is any. The crab mustard is the hepatopancreas, a filtering organ found in crabs and lobsters. These innards do sound toxic to ingest and probably are but for some people they are a delicacy.

My process of cleaning the hard-shell crabs is quite similar to preparing the soft-shell ones. The major difference is removing the entire carapace in order to to get to the yellow-orange matter. The hard-shell crabs are much stronger and faster than the soft-shell ones so you need to work a little faster and apply some pressure when removing the carapace. I remove the following parts with my fingers but you can use scissors with pointy tips--carapace (dorsal shell), the gills on each side of the body, the pointy ends of the legs (not necessary if you use are making stock), the V-shaped apron on the abdomen and mouth parts. Scoop out the yellow-orange innards and reserve it in a separate bowl. For me, the best way to remove the most of the innards is to use a pointy flat knife. They are found in the interior of the carapace and on the middle of the body just underneath the carapace. Once these tasks are complete rub a little salt on the prepared crabs, rinse them in cold water, strain and place them in a clean bowl or pot to be used. Save the scooped out roe and crab mustard and keep them refrigerated until ready to be used.

green crabs
lift up with one thumb just under one side of the carapace while
holding onto the belly with the other hand and push
with that thumb (while applying some pressure)
to separate the entire carapace
separating the carapace from its body
carapace and crab body
pull out the mouth parts and discard
pull out the gills on each side of the body and discard
ventral view (belly side)--mouth parts, apron, pointy legs
break off the pointy walking legs and discard
use scissors or a knife to life up the apron, pull it off and discard
remove the roe and crab mustard found on the middle of the body and save
remove the roe and crab mustard from the interior of the carapace and save
prepared crabs with roe and crab mustard
crab roe and crab mustard--rinsed in cold water and strained
Helpful Hints:

*If you are planning on crushing the crabs then you may keep the point legs intact to save time. Removing them makes no difference in your stock.
*In my family we clean the prepared seafood with a salt rub (about 2 teaspoons to 1 tablespoon) and then rinse with cold water several times to remove the salt. You can also do the same by using vinegar (about 2-3 tablespoons) to wash then rinse with cold water immediately. Do not allow the seafood to soak in the salt or vinegar as it will change their taste and texture.
*When preparing the crabs you may want to wear gloves to prevent injury. I find that wearing 2 layers of the exam gloves to be most helpful when cleaning the crabs. You may purchase these exam gloves at your local pharmacy store.

Tuesday, August 7, 2018

Salt and Pepper Crab (Cua Rang Muoi)

Salt and pepper crab known as cua rang muối in Vietnamese is one of the popular dishes in Vietnam, and typically made with much larger crabs. According to my mother the poor people in Vietnam make this dish using the rice paddy crabs or rice-field crabs. The entire body is eaten whole but not the legs or claws as they are generally too tough. When making this using hard-shell green crabs it is best to eat only the center part of the body that has the flesh and cartilage. The legs and claws may be too hard to ingest whole. It is best if you can find semi-hard shell ones. This dish tends to be a little more salty than normal and it is consumed along with plain steamed rice and extra vegetables. I served the crabs over a bed of red cabbage and fresh mint salad. For this recipe I prefer to use smaller green crabs, those less than 1 1/2 inches across the carapace.

salt and pepper crab (cua rang muối)

Salt and Pepper Crab (Cua Rang Muối)

Ingredients:

35 small (1 to 1 1/2-inches) green crabs, prepared, washed, drained
1/3 cup cornstarch
1/4 tsp salt
1/4 tsp ground black or white pepper
1/8 tsp turmeric powder
1/8 tsp sugar
Oil for deep frying
2 tsp vegetable oil
1/2 medium white or yellow onion, peeled and cut into wedges
1/3 cup chopped green scallions
1 large garlic clove, peeled, finely grated
3/4 tsp Salt and Pepper Seasoning (see recipe below)

Method:

Prepare the crabs as usual but leave the roe and crab mustard (orange and yellow matter) intact in the bodies. Remove and discard the carapace, gills, mouth piece, apron, intestine, and pointy distal legs. To clean the crabs sprinkle about 2 teaspoons of salt to the prepared crabs and gently rub them. Rinse in cold water 2-3 times to remove the salt. Let them drain in a strainer.

Use a 1-gallon bag or a large container with a lid, mix cornstarch, salt, pepper, turmeric powder, and sugar. Shake the bag or whisk the contents in the container to mix all ingredients. Add the prepared crabs in the bag or container. Shake to coat the crabs with seasoned flour. Heat the oil until it is around 350 to 375 degrees F. May test the oil by dropping in a leg. If the leg sizzles and fries quickly then the oil is hot and ready. Add about 5 crabs at a time to the oil. Fry until they are golden, about 2 1/2 to 3 minutes and remove them onto paper towels to remove excess oil.

In a large pan or wok add about 2 teaspoons of oil. Once the oil is hot add onion, scallions, and garlic. Saute about a minute or until the onion is cooked to your preference. Add the fried crabs. Add a little of the Salt and Pepper Seasoning in at a time. Stir and add more of the seasoning. Repeat this process until the seasoning has been used up. Serve over a bed of Cabbage and Mint Salad (see recipe below).

Salt and Pepper Seasoning

Ingredients:

1/4 tsp salt
1/4 tsp ground black or white pepper
1/4 tsp sugar

Method:

Mix all ingredients.

Cabbage and Mint Salad

Ingredients:

About 1/2 small red cabbage, finely shredded
10-15 large fresh mint leaves, julienned
Juice from 1/2 fresh lime

Method:

Mix all ingredients right before serving.

Helpful Hints:

*Generally I would add a little salt and pepper to this salad but since the crabs already have plenty of salt and pepper I omit them for this post. Add more or less mint if you are interested.
*Prepare the ingredients for the Cabbage and Mint Salad and set aside in the refrigerator. Once your crabs are just cooked and still hot quickly mix the salad and serve while the crabs are still warm.

Sunday, August 5, 2018

How to Modify a Crab Trap

When my friend, Captain Ralph MacDonald heard that I have an interest in capturing and eating the invasive green crabs he gave me a brand new crab trap and some fish carcases. Thank you Ralph! After inspecting it I quickly realized the spaces between the wires were too wide allowing these tiny crabs to escape. I expressed my idea of finding a material to make the holes smaller to my husband, so we visited our local Home Depot for steel hardware cloth. This post is a DIY on how to modify a store-purchased crab trap to capture the green crabs. You may have a better idea on how to alter the trap but this is what makes sense to me. When working with the wires be careful not to puncture your skin! I was very cautious but ended up pricking myself, fortunately just once with the tiny wire.

This will be my one and only medical or nursing comment about working with wires and harvesting marine animals--be sure your tetanus vaccine is up-to-date. Please have a conversation with your primary care provider if you are unsure. This is a food blog and I will try to answer only questions regarding green crabs, any crab questions I don't have the answer for I will do my best to find it. I will defer all medical and nursing questions to your primary care provider. If you do not have any please find one.

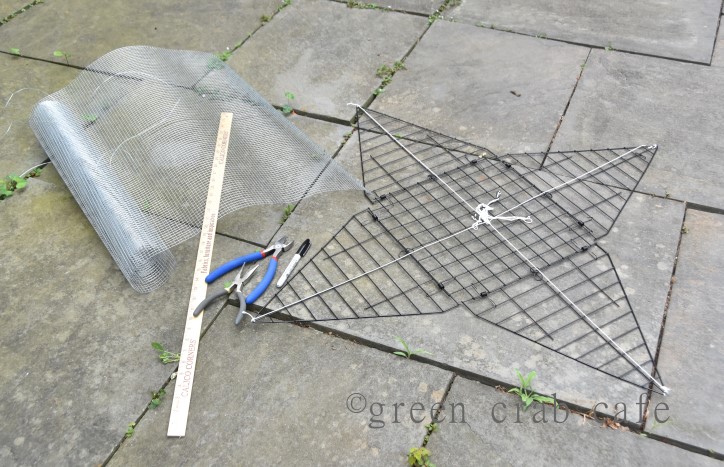
This trap took me several hours to make but it was also my first attempt at this. The whole process was not at all complicated. I basically cut out the panels and attached them to the exterior sides of my trap. The cutting took the most time because I was using a small wire cutter. I cut 2 1/2 to 3 inch length wire pieces (recycled from the wire that came wrapped around the mesh cloth) to secure the panels together. For the edges along the vertical sides of the pyramid I used a long nose pliers to wrap the new exterior sides to the original sides. I avoided wrapping any parts that were adjacent to the center square panel. All of the triangular panels must be able to move quickly and easily (flatten out when the entire trap is on the seafloor and back into a pyramid shape when pulling up on a string or rope). Any pieces of wire that were cut and sticking out I bent them with a long nose pliers to create a dull edge for safety reasons. I find that adding the new exterior sides on the outside of the original sides and wrap the wires inward is safer than having the pieces inside and wrapping out. If you modify your own trap you can decide what works best for you.

I use a soft mesh bag from a recycled clam bag, purchased at a seafood market, to store my bait and tie it to the center of the trap. I don't like waste so every time I return home I untie my bait bag and place the entire bag inside a plastic bag and store it in the freezer for the next crabbing trip. I use the same bait bag with the same bait. I would refresh it by adding 1-2 small new pieces of fish for each trip. On my first attempt I was able to pull up 101 green crabs in 2 hours. The second attempt I got 80 in an hour. The third time I pulled up a record of 103 crabs in an hour. The fourth time and most recent trip I went with scientist/researcher Dr. Bradt and pulled up 42 crabs in 45 minutes. Most of the crabs were roughly from 1 1/2 to 2 1/2 inches. The last batch I was able to get one that was 3/4 inch, the smallest from my trap.

modified crab trap


drop the trap in the water and secure the lines loosely to the dock
look closely and you will see the crabs crawling towards the bait
green crabs

How to Modify a Crab Trap

Supplies:

1 Eagle Claw Star Crab Trap
1 roll of 1/4 in. x 2 ft. x 5 ft. 23-Gauge Galvanized Steel Hardware Cloth
About 2 feet of wires
1 long nose pliers
1 wire cutter
A yardstick (optional)
A marker (optional)
Magnet (optional)

Instructions:

On a flat surface open up the trap and roll out the steel cloth.

supplies
open  up the trap and roll out the steel cloth
Cut a square panel out of the cloth for the bottom (center piece) of the trap, leaving about 1/4 to 1/2- inch extra (on the cut sides) in order to bend the edges of those sides so the cut (sharp) pieces will not stick out and cause you present and future injury. It is always best to cut slightly larger than what you need and then fold in what you don't need. You may use a yardstick and a marker to mark the area (although you may end up putting some of the marker along the yardstick edge permanently) to guide you if needed. The yardstick is not necessary but it may help guide you.

cut out a square piece (for the bottom of the trap)
fold or bend the cut (sharp) edges with a long nose pliers
the bottom part is cut and the edges are not sharp to the touch
Cut the cloth into triangular shapes, again about 1/4 to 1/2-inch larger around the periphery than the original pieces. This way you can wrap the vertical sides along the original sides. For the top (tip) of the pyramid you do not want to close it up entirely. If you happen to do that (which I did) it is OK since you can always cut it out later. For some of the sides I cut the cloth in a straight line instead of following the angle of the triangle because it is quicker and easier. Wrap the edges of the vertical sides tightly along the original sides using a long nose pliers. Be sure that all the sharp edges are pressed tightly inward to prevent injury.

cut the pieces for the vertical sides
(try not to cover the tip of the opening,
if you do it is not a big deal, you can cut out the holes later)

use a long nose pliers and wrap the sides
of the exterior panel tightly to the original trap
fold or bend the cloth to wrap the interior original trap
Cut 2 1/2 to 3-inch wire pieces (may use the same wire that came already wrapping the cloth). Take a piece of wire and make a U shape and loop from the outside (of the trap) to inside the trap to secure the new exterior sides to the original sides. Take the long nose pliers and twist the wire piece to secure tightly. Bend any sharp edges underneath. Make sure nothing sharp is sticking out where it can cause you injury. Repeat this process on all sides of the trap to secure the panels.

cut the wire into 2 1/2 to 3-inch lengths
make a U shape with the cut wire pieces
loop the U shaped wire from the outside in to secure the 2 panels
use a long nose pliers to twist the wire a few times
the tie should look something like this
bend the sharp tips underneath to prevent any injury
Once all the exterior sides are completely secured to the original trap, look carefully for any sharp areas. Use the long nose pliers and bend any sharp pieces inward so they will not stick out and cause injury. Pick up any loose wire pieces from your work area and after the project is complete, properly discard them in the trash. You may use a magnet to help.

pick up any loose wire pieces and put in a container
may use a magnet to assist with this job
if you happen to cover up the triangular side while working on the trap
(see next photo below)
cut out a hole at the top (tip) of the pyramid trap
 in order to loop a rope or bungee cord through later
now the top (tip) of the pyramid trap has openings
for a rope or bungee cord to loop through
When you use your trap be sure to bring a long nose pliers and wire cutter with you in case you need to secure or fix it. Be sure to wash all of your supplies and trap with fresh water after using to prevent rust.

my typical crabbing supplies: a cooler, a bag with fresh water,
paper or cloth towels, extra bait, knife, scissors, long nose pliers,
wire cutter, small bungee cord, and bandaids

Vietnamese Crab and Asparagus Soup (Sup Mang Cua)

Apparently Vietnamese crab and asparagus soup (súp măng cua) is a popular soup eaten on special occasions such as wedding banquets in Vietna...