This will be my one and only medical or nursing comment about working with wires and harvesting marine animals--be sure your tetanus vaccine is up-to-date. Please have a conversation with your primary care provider if you are unsure. This is a food blog and I will try to answer only questions regarding green crabs, any crab questions I don't have the answer for I will do my best to find it. I will defer all medical and nursing questions to your primary care provider. If you do not have any please find one.
This trap took me several hours to make but it was also my first attempt at this. The whole process was not at all complicated. I basically cut out the panels and attached them to the exterior sides of my trap. The cutting took the most time because I was using a small wire cutter. I cut 2 1/2 to 3 inch length wire pieces (recycled from the wire that came wrapped around the mesh cloth) to secure the panels together. For the edges along the vertical sides of the pyramid I used a long nose pliers to wrap the new exterior sides to the original sides. I avoided wrapping any parts that were adjacent to the center square panel. All of the triangular panels must be able to move quickly and easily (flatten out when the entire trap is on the seafloor and back into a pyramid shape when pulling up on a string or rope). Any pieces of wire that were cut and sticking out I bent them with a long nose pliers to create a dull edge for safety reasons. I find that adding the new exterior sides on the outside of the original sides and wrap the wires inward is safer than having the pieces inside and wrapping out. If you modify your own trap you can decide what works best for you.
I use a soft mesh bag from a recycled clam bag, purchased at a seafood market, to store my bait and tie it to the center of the trap. I don't like waste so every time I return home I untie my bait bag and place the entire bag inside a plastic bag and store it in the freezer for the next crabbing trip. I use the same bait bag with the same bait. I would refresh it by adding 1-2 small new pieces of fish for each trip. On my first attempt I was able to pull up 101 green crabs in 2 hours. The second attempt I got 80 in an hour. The third time I pulled up a record of 103 crabs in an hour. The fourth time and most recent trip I went with scientist/researcher Dr. Bradt and pulled up 42 crabs in 45 minutes. Most of the crabs were roughly from 1 1/2 to 2 1/2 inches. The last batch I was able to get one that was 3/4 inch, the smallest from my trap.
 |
| modified crab trap |
 |
| drop the trap in the water and secure the lines loosely to the dock |
 |
| look closely and you will see the crabs crawling towards the bait |
 |
| green crabs |
How to Modify a Crab Trap
Supplies:
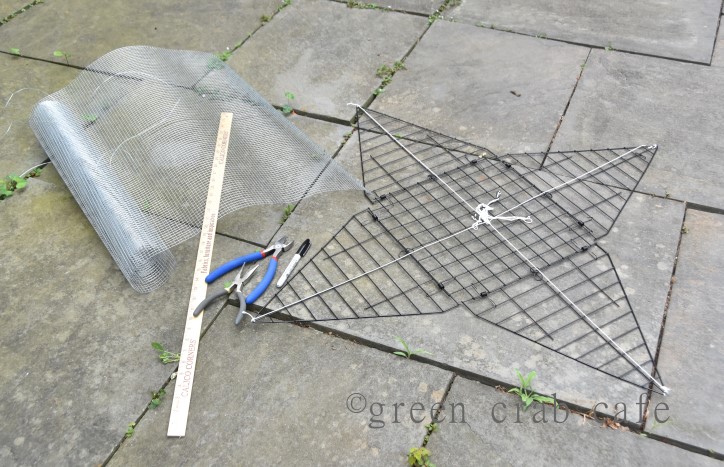
1 Eagle Claw Star Crab Trap
1 roll of 1/4 in. x 2 ft. x 5 ft. 23-Gauge Galvanized Steel Hardware Cloth
About 2 feet of wires
1 long nose pliers
1 wire cutter
A yardstick (optional)
A marker (optional)
Magnet (optional)
Instructions:
On a flat surface open up the trap and roll out the steel cloth.
 |
| supplies |
 |
| open up the trap and roll out the steel cloth |
 |
| cut out a square piece (for the bottom of the trap) |
 |
| fold or bend the cut (sharp) edges with a long nose pliers |
 |
| the bottom part is cut and the edges are not sharp to the touch |
 | |
| cut the pieces for the vertical sides (try not to cover the tip of the opening, if you do it is not a big deal, you can cut out the holes later) |
 |
| use a long nose pliers and wrap the sides of the exterior panel tightly to the original trap |
 |
| fold or bend the cloth to wrap the interior original trap |
 |
| cut the wire into 2 1/2 to 3-inch lengths |
 |
| make a U shape with the cut wire pieces |
 |
| loop the U shaped wire from the outside in to secure the 2 panels |
 |
| use a long nose pliers to twist the wire a few times |
 |
| the tie should look something like this |
 |
| bend the sharp tips underneath to prevent any injury |
 |
| pick up any loose wire pieces and put in a container may use a magnet to assist with this job |
 |
| if you happen to cover up the triangular side while working on the trap (see next photo below) |
 |
| cut out a hole at the top (tip) of the pyramid trap in order to loop a rope or bungee cord through later |
 |
| now the top (tip) of the pyramid trap has openings for a rope or bungee cord to loop through |
 |
| my typical crabbing supplies: a cooler, a bag with fresh water, paper or cloth towels, extra bait, knife, scissors, long nose pliers, wire cutter, small bungee cord, and bandaids |
.jpg)
No comments:
Post a Comment